Tuesday, December 1, 2009

My Favorite Photos of the Semester


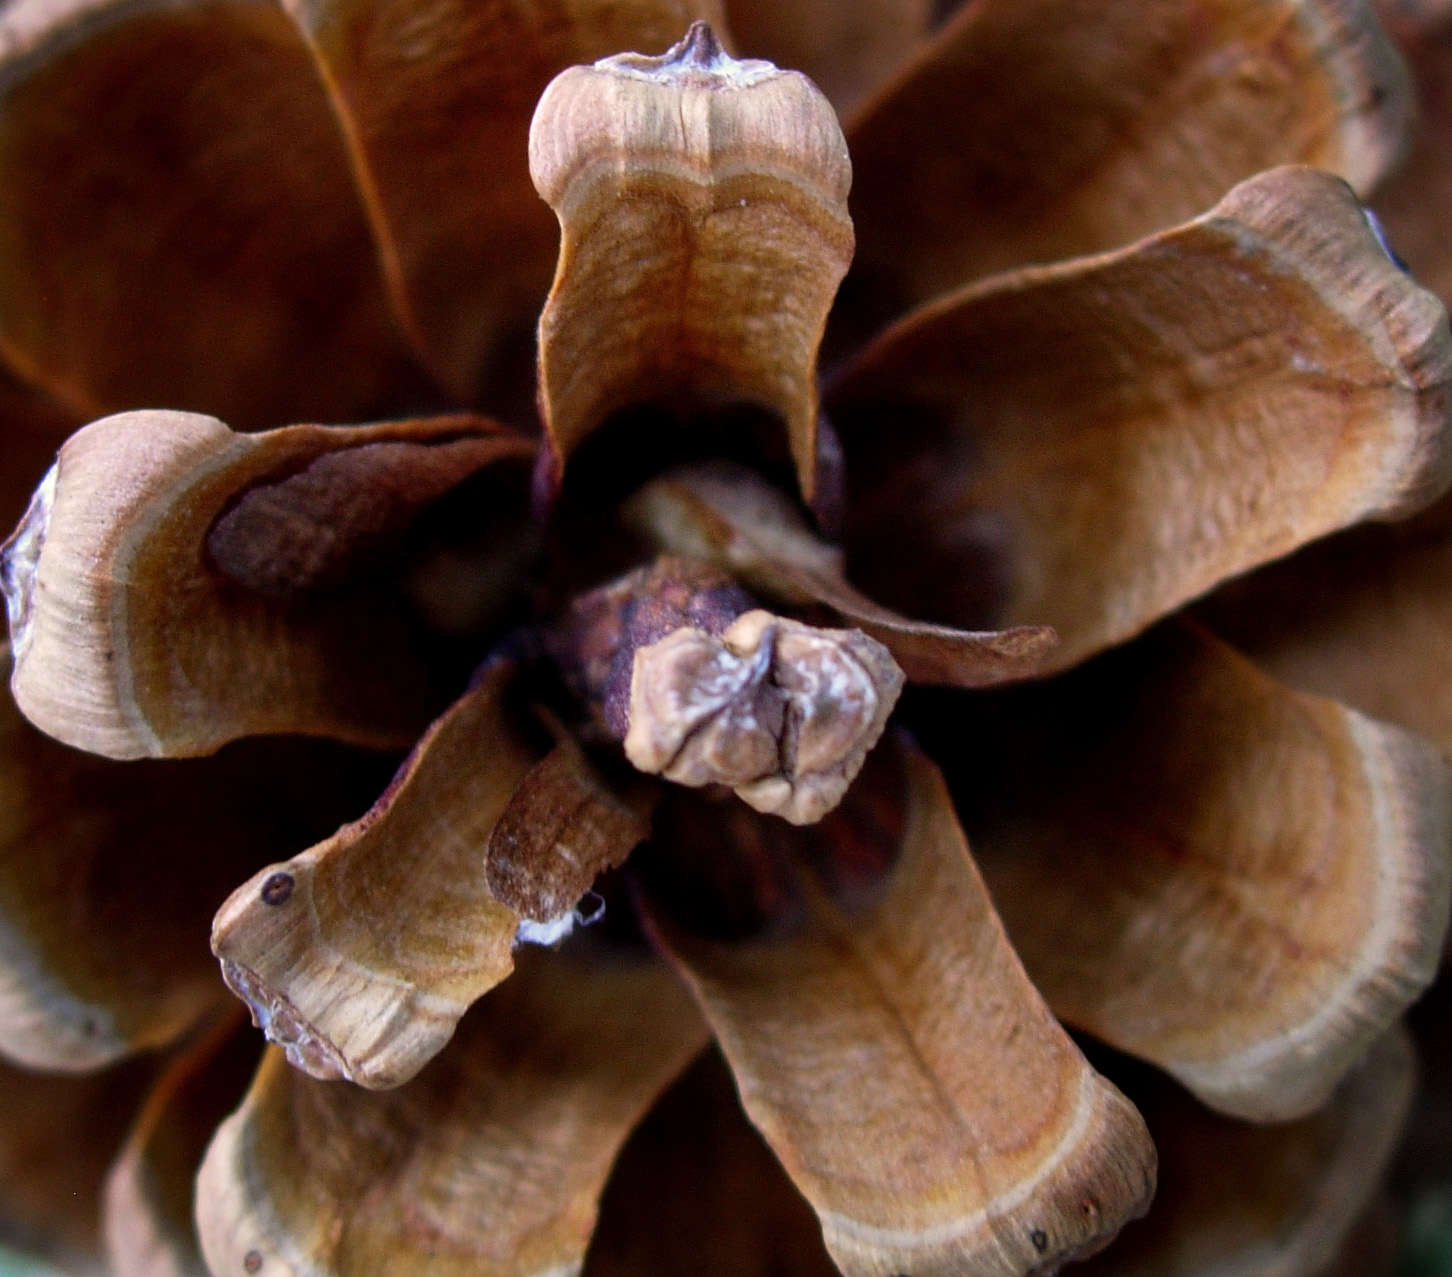
I liked this photo because it's a different view of a pine cone than you usually see. I was trying to make it resemble a flower. I was at Zimmerman Park when I took the shot and used the macro setting on my camera. I cropped it down to cut out some distracting elements in the corners and I also used a gradient filter in the corners to darken the bright spots. I darkened the overall image by adjusting the histogram and I used a warming filter to bring out the oranges and yellows of the pine cone. I wish that the foremost part of the cone was more in focus, but I'm generally happy with how it came out.


I shot this dead yucca plant with my macro setting at Zimmerman Park. It's a color photo but naturally looks black and white, which I liked. I also like the abstract design and detail of the fibers in the image. I adjusted the histogram to bring out more detail and used a warming filter on this image, but that's it. I am happy with how it turned out I just wish I could have taken a longer exposure to capture some of the detail that got blurred.

This is my favorite image that I took this semester. I love the color of the rose and the detail in the petals and water drops. This was on Rocky's Campus in front of the Eaton Administration building. I used the macro setting on my camera and cropped in on the rose when editing. I also used a gradient filter on everything but the rose petals. I adjusted the histogram to bring out detail and I saturated the red a little so that it would pop more. I wish I had a nicer camera so I could have blurred the background out more but other than that I really like this image.


I liked this photo because I thought it was a privilege to see so many pronghorn together. Apart from the bison in Yellowstone I've never seen such a large herd of ungulates. I was on the Rim Country Institutes land and used the landscape setting on my camera. I cropped in on the herd when editing and used a gradient filter on the top and on the bottom to darken those areas. I also adjusted the histogram which helped bring out more detail in the pronghorns. I used a warming filter which I thought went well with the color of the fur, grass and rock. I again wish I had a nicer camera with a telephoto lens, so I could zoom in closer to the animals and get a more intimate shot. I also wish my camera had better photo quality because cropping in as much as I did created some noise that I wish wasn't there.

This was probably my second favorite photo that I took over the semester. This was at a campground on the way to Yellowstone in the Beartooth Pass. I used my landscape setting and a gradient filter on the sky. I did some adjusting to the histogram as well. I used the clone tool quite a bit on this photo. I cropped in to cut out some of the plants and distracting elements on the bottom of the image but I didn't want to crop anymore than I did so I was obliged to remove some leaves, twigs and a post from the bottom of the image. I love the reflection but I wish it was more clear. I also wish I was capable of taking a longer exposure to capture some more detail in the distance.


Photoshopping

I'm not blogging about the last chapter of our book that covers the same topic, but about my own personal experience with editing my photos.
I've never photoshopped any of my photos until last week. I used the Adobe Elements program in the Wood's Lab on campus and I had a great time tweaking my photos to make them look better. I have to say that I am overwhelmed with how much better you can make a photo look with only 20 minutes or so of work. After I got the hang of it, the only reason it really took me that long was because I'm a fairly indcisive person and I kept tinkering with things and jumping back and forth between ideas. The thing I had the most trouble with was deciding whether or not to use a warming filter or a cooling filter or none at all. I found that 9 times out of 10 I opted for the warming filter if I used either. I think that the cooling filter created a more unnatural feeling to my photos while the warming one highlighted my images, but I have to keep in mind that most of my photos incorporated yellows, oranges and reds, so a warming filter went better.
The clone tool is probably the coolest thing ever, at least as far as photoediting is concerned. It was so easy to use and before I knew about it I was ready to forgo some of my images because of little human elements that ruined them, but the clone tool came to the rescue and I was able to remove them.
The two things that I utilized the most were gradient filters and adjusting the light with the histogram. With these two tools you can turn any decent photo into a good or great photo. I don't remember what Adobe calls it, but I call it the spot gradient tool or being able to place a gradient tool over certain parts of the photo without darkening the rest. This came in handy when I had an extremely bright or washed out spot in a photo and I was able to darken it so that it wasn't too distracting, while not darkening out the main subject which I wanted to remain bright.
I've determined that for my photography needs I need to buy two things before I even purchase a new dslr. First I need a new powerful laptop and second Adobe Photoshop software. I can work with my point and shoot and still produce images that I think turn out nice, but to edit them so that they become great (in my opinion), I need a better computer and Photoshop. That new dslr seems even further away now, but I know that my current computer can't hack it with the file size of the raw photos or with the amount of memory required to run Photoshop. My only solution is to win the lottery.
On a different note, I want to thank Dave for all his help and information in getting me on my way to becoming a better photographer. I've always wanted to take a photography class and I feel I learned a great deal of useful information during the semester that will come in handy on my future adventures. Thanks!

Student Art Exhibit

I went to the art exhibit with my girlfriend and she really enjoyed Krista's flamenco dress exhibit. She spent a few years living in Sevilla and went to La Feria with her friends so it brought back some memories for her. For my part I thought the paintings were pretty good, I liked the use of colors especially the Sevillanas painting that she made her postcards of. The dark blue and vibrant red contrast in a beautiful way.
The fashion exhibit was cool but not my cup of tea. I did like the portrait painting but the rest didn't really suit my palette. My girlfriend works with Monica so she was excited for this exhibit too.
Cassie's exhibit "99 Pills," I found depressing. I think that was the effect she wanted and it made me feel really sorry for her having rheumatoid arthritis at such a young age. I liked the multiple painting styles used for the same image, especially the 50's style comic version. The thing that moved me the most was the guitar with wire and nails wrapped around it. I'm learning to play the guitar myself and I can't imagine how difficult it would be to play with arthritis.
To sum up I'm not too fond of the abstract art on exhibit, but I did find some things that were interesting in all the exhibits and I can appreciate the messages and imagery that they were trying to portray, but it's definitely not my type of art.

Wednesday, November 18, 2009

Why can't I get paid to do this?

By a stroke of luck my blogging assignment was extremely easy this week. I brought up my yahoo browser and there was an article about photoshopping a photo of Demi Moore, that went extremely wrong. Just so everyone knows I don't follow fashion photography and I know that this has nothing to do with nature photography, but I thought this article was fitting since we are discussing editing photos in class.
In the photo part of Demi's left hip seems to vanish, while her clothing remains in the place where her hip should be. I have to agree with the sentiment of the article, how could such a blunder go unnoticed? Especially on the cover of a magazine when I'm sure whoever was involved in the editing made a ton of money. I guess I just find it amusing more than anything. It also teaches the lesson that if you're going to manipulate your photos make sure you pay attention to what you're doing. Trying to manipulate and remove objects can create gaps or holes in your photo that can ruin an image, regardless of the type of photography you're involved in. I've posted two different links covering the same topic below, if you're in the mood for a little amusement.

Thursday, November 12, 2009

My Pick


My favorite images of the day were used for other assignments, so I was kind of left with this one. Not to say I don't like it, but I liked others more. This one I shot with the macro setting on my point and shoot camera. I like how it shows depth and how it's framed. The red branch draws your attention and the focus draws you back and down to the main subject the water drops which point down to the yellow branches that lead you back upward to the red branch it forms a kind of circle brining you back to the main subject the water drops.

Rule of Thirds


I took this photo trying to adhere to the Rule of Thirds. I used the landscape setting on my point and shoot camera. Vertically I tried to line up the larger rock in the left third, the closer bush in the right third and the background in the middle third. Horizontally I tried to get the smaller rock and leaves in the lower third while catching the bushes in the middle third and leaving the upper third for the uninteresting background elements. I think it came out alright for what I was trying to do.

Detailed Close Up


This is probably my favorite photo that I took this afternoon. I shot this picture using the macro setting on my camera. I thought about using it for my "red" assignment, but it was the best close up I had so here it is. I really liked the detail of the flower and how it stands out against the dreary background. The water beads add an extra element to it's beauty as well.

Blurred Motion


I used my macro setting for this blurred image shot. I may have cheated by using my own motion to create the image, but I was having a heck of a time finding anything else and the only good image of blurred snow and rain I had I used for other assigned tasks and I didn't want to double dip. I shot the bark of the giant willow near the campus entrance and just panned upward. I think it created an interesting abstract photo, that leaves you wondering what the heck it is.

Panning


I had to stray from nature topics to capture my panning image. I walked towards Poly Dr. and caught this SUV as it drove by. I think I did a fairly good job capturing it with the sports setting on my point and shoot camera. It turned out pretty good everything is blurry but the SUV which is still fairly focused. I like the added element of rain/snow blur and how you can make out the driver in the vehicle because he has an awesome hat.

Hyperfocal


I shot this photo from the entrance to Rocky's campus. I used the landscape setting on my point and shoot. I like how everything is in focus but still hazy because of the snowfall, fog and clouds. These trees really stand out due to their size and greenery with a bleak surrounding. I was hoping to capture the rims more in the background but you can barely make them out giving a ghostly feel to it. The photo has a depressed appearance to it making you wish that you weren't there and believe me I didn't want to be.

Silhouette


So, I didn't get any good photos of a silhouette but I was able to capture this cool shadow of a tree in a puddle near the cafeteria. I used my macro setting for this shot and was also lucky to capture a large raindrop hitting the water adding a nice ripple. I like this photo because it brings together a bunch of not so amazing subjects and makes them more interesting than they would be on their own.

Reflection


To get my reflection shot I used the water that was captured on the strange statue in front of the library. I used the normal camera setting on my point and shoot to capture this image. The combination of water on top of the brown metal and lighting made for a decent reflection, allowing for some good detail of the trees bark. It's not the most pleasing image, but I couldn't find a nicer reflection anywhere else on campus.

Red


For my red photo I shot this two toned leaf. I only have a point and shoot camera so I wasn't able to adjust my aperture or shutter speed manually, so to capture this image I used the macro setting on my camera. I thought it was a cool looking leaf because of how it was split down the middle between red and green. I was trying to show how it stood out against the other leaves on the plant.

Wednesday, November 11, 2009

Nature Photographers

I didn't have anyone or anything specific to look up today, so I just typed 'nature photography' into google. The first thing I found was www.naturephotographers.net an online nature photography magazine. It's kind of like Walmart it has everything under one roof. There are articles discussing gear, techniques and locations to shoot. It has an online store to buy gear and weekly contests.
The photo I posted is the current weekly winner. Sorry the image is tiny I had to copy a thumbnail because they won't let you copy the larger images. The photo was taken by John Williams from Battle Ground, WA. He shot it with a Nikon D80 with a Nikon 50mm f/1.8. Dave won't like this, but it is actually a combination of three photos two at 2 sec at f/16 and one at 1/8 sec at f/13. He didn't say why he used two photos at the same setting. How he achieved it is beside the point because it's a nice photo(s) and you should go to the site and get a better view than the thumbnail I posted here. There are galleries with tons of other photos to get lost in for awhile as well.
Nature Photographers is a cool website with a lot of useful information and reviews. They also offer tips and online courses to further your knowledge and abilities as a photographer. If nothing else it has a lot of cool pictures from various photographers to peruse.

Teleconverters for Macro Photos

Teleconverters are a great way to get a little closer to your subject in you viewfinder without having to spook them off by being close to them physically. You can maintain your lens' focusing range while magnifying the view of the image. A 500mm lens with a 1.4X teleconverter becomes a 700mm getting a tighter frame around your subject, from further away. It's great for shooting skiddish animals or insects. It comes at a cost of about 10% image quality for a 1.4X and 20% for a 2X teleconverter. The image quality problems usually occur around the periphery so if you keep this is a blur it shouldn't matter.

Wednesday, November 4, 2009

Heligimbal


After watching Disney's "Earth" in class I became interested in the heligimbal cameras used to shoot them. I've seen the BBC's "Planet Earth" series (actually I own it) and it is simply just amazing how they can zoom in on a subject from miles away without disturbing them and capture the scene in such great detail.
Heligimbals are cameras mounted to the bottom of a helicopter. The technology was first developed by the military and it uses a gyro-stabilized system which neutralizes the helicopters vibrations. The camera is controlled by a joystick from within the helicopter.
The BBC and Disney used the cineflex V14HD heligimbal with sony HD cameras. The system weighs about 95 lbs and is less than 15" in diameter. The gimbal is rated for wind loads up to 200 knots (230 mph) and doesn't significantly change flight characteristics. The V14 has a 360 degree continuous panning ability, 165 degree tilt, and +/- 45 degree roll. The system is designed around an integrated camera, Sony's CineAlta HCS-1500 which can achieve a resolution up to 1920 x 1080. It can utilize Canon and Fujinon's HD zoom lenses. An embedded Sony RM-B750 Remote provides access to all the cameras functions through a touch screen interface. Built in microprocessors sample data over 2500 times a second with an instantaneous feedback loop and motor control system that removes vibration. Automatic heaters warm the motors in cold environments and the system can function at 20 below and up to 120 degrees Fahrenheit. I couldn't find any prices for the system because the company wanted you to contact them for further information, in that regard. I did however find the costs for renting one in FL. They rent for $3,500.00 a day, $24,500.00 a week, and $98,000.00 for a month plus a $1,500.00 deposit.
Heligimbals are out of my price range, especially since I don't have a helicopter to mount it to, but I will continue to enjoy watching them at work in movies and documentaries. It is an amazing technology that can achieve things other cameras are incapable of, from views impossible to reach by any other means than in a helicopter.

Nature's Mystical Mirrors

Capturing reflections on still water is one of the most beautiful and dramatic forms of landscape photography. When setting out to shoot reflections keep in mind that you may have to get into the water to capture the image from the best angle possible. So bring along some fishing waders and a waterproof tripod or an old one you don't care about. Know where you're going as well. Take reconnaissance walks to find good locations before you haul out your camera equipment. The best time of day for reflections is in the morning right before and after sunrise, so knowing where to set up shop before hand can put you in the right place at the right time. You don't want to be fumbling around in the dark for a spot that may turn out to be a poor one, so do some homework before hand. Look for places with wind barriers to keep the water calm during your photo shoot, these natural features like logs, exposed rocks and sandbars can also be incorporated into your photo. If you are shooting in shallow water lower the camera position so that the sand or gravel underwater doesn't blend into the reflection.
To shoot reflections you will need to utilize filters to capture the details of the shadows and highlighted areas. A polarizing filter should be used to darken the sky as much as possible which will result in the pool giving a more distinct reflection. A one-stop split neutral density filter can further reduce the brightness of the sky and bright landforms, bringing greater detail to the whole frame. Check the histogram to make sure it is centered and within 80% or less of the total width. A two-stop split neutral density filter may be needed to darken very bright skies or snowy mountains. If this is the case your reflection may be too bright as well, while the middle remains dark. Placing a one-stop split neutral density filter over the reflection while keeping the two-stop filter over the sky and snowy mountain will bring the shadow area in the middle within your cameras sensor range. This is called the filter squeeze just remember to angle your filters with your landscape and reflections.

The Power of Perspective

Portraying depth in photos can be difficult, but it is what makes landscape photography captivating. A camera can't take in the whole view like our eyes can, making it hard to capture the overwhelming beauty of a landscape. Using features of similar sizes like trees or animals can help put the size of your landscape into perspective. It is best to arrange objects (size cues) from largest to smallest and on diagonal plane that lead up to the image's center of interest. Using wide angle lenses can increase the perceived distance between your size cues creating a feeling of deep space, while telephoto lenses do the opposite by narrowing in on the cues. Position your camera close to your camera, until you find the best height and angle to capture the image you want. Use a slow exposure and wide aperture to capture all the detail within the frame. Take your time because trial and error will eventually lead to your ideal image and remember to use a cable shutter release so you don't bump your camera system during the long exposure.
Overlapping elements in your photo can create striking images or if done poorly can ruin them. Choose subjects with contrasting colors, different line directions and varying brightness and shapes. Utilizing sidelight accentuates shadows and helps bring out size cues and textures. Shooting in hazy situations like fog or dust can bring out the detail of close objects but will obscure distant ones. With all this considered it is best to look for five planes within your landscape photo. First the foreground with interesting details and size cues to set up perspective. Next comes the midground with well defined size cues leading towards the main feature of the photo. The feature plane shows the main subject of the image. The cloud plane is the forth, look for big puffy expressive clouds. The sky forms the fifth plane and depending on the time of day can vary in color. Capturing all of these planes will create an image projecting an endless deep space.

Monday, November 2, 2009

Finding Photogenic Landscapes

There are ten things to consider when searching for the perfect landscape, it's not always possible to find them all in a single setting, but utilizing a few can create striking images.
Color is the single most important aspect to consider when photographing landscapes. A strong color such as red helps to create great images that stand out to a viewer. Subtle color harmonies can also yield great pictures, such as cool hues from a foggy seascape.
Clouds make the difference when photographing landscapes, preferably ones that are near the horizon and above your main target. During the prime lighting of sunrise and sunset clouds turn an array of different colors creating a more dramatic and dynamic image. Clouds can also help make photographing at midday possible by diffusing light from the sun.
Calm atmospheres are great for capturing detail. The slow shutter speed used for landscapes makes shooting difficult in windy situations, creating blurry images. Still moments allow you to capture all the detail of the surrounding area such as wildflowers, grasses, pools of water, etc. The best time of day to find these ideal conditions is 30 minutes before and after sunrise.
Falling snow, fog, mist and haze give landscapes a moody energy and give added features to the landscape.
North and south camera angles at sunrise or sunset, depending on your location, will yield a wonderful side lighting upon your landscape. This brings out detail and color more effectively than other lighting angles.
When you find your target landscape check the eastern and western horizons to make sure they are clear of light-obstructing landforms. The time of day is important here, if the eastern horizon is clear take photos in the early morning. If the western horizon is open shoot at sunset.
When photographing landscapes don't forget the small details. Utilize features like rock formations or plants and place them in the foreground, this adds depth and gives scale to the scene.
Knowing when the moon will be present in the sky can add an extra element to your landscape. Capturing the sun in an image creates problems with contrast and will require a lot of editing to create a satisfying image.
Still waters can create amazing images by allowing you to reflect landscapes onto water. Capturing these reflections requires you to have the right angle and sometimes means getting into the water, so be prepared with waders or a swimsuit.
Shooting landscapes with animals is a rarity. It is best to concentrate on the landscape and pray an animal waltzes into your scene. The best opportunities arise when you are shooting wildlife. Take a moment and a few steps back to capture the whole scene.
The final thing to remember is to keep human artifacts out of the image. These features can ruin a beautiful scene, but shooting in national parks and forests can limit this problem since they have less human influence than most places.

Wildlife Portraits

To get a great portrait of a wild animal you don't want to take a wide angle lens along, rely on your telephoto lenses. Telephoto lenses are ideal because you can keep your distance from the subject and give you enough power to narrow in and capture the intimate detail that you are after. The distance allows you to photograph natural behavior instead of taking shots of the animal reacting to your presence and is safer when shooting dangerous animals.
There are three areas of the photo to consider when shooting wildlife; the foreground, midground and background. All three must blend together around the main subject of the picture to create a harmonious image. Things in the foreground should be well out of the depth of field or else they can appear distracting. Foreground elements should blend with parts of the mid or background. Out of focus grasses, branches, flowers or some aspect of the animals environment make up the foreground. The midground is mostly your subject but should also contain some of the grasses, branches, flowers or whatever environment the animal is in. The midground is in focus with the foreground and the background blurry around it. The background being out of the depth of field should contain colors that blend well with the two front layers. Slightly out of focus elements of the environment in the background help create harmony with the mid and foreground.
Who you are taking photos for will determine how you choose your subjects. If you are shooting solely for yourself and want to shoot every living thing you see that is fine, but if you are trying to sell your photography you need to be more selective with your subject. Choose vibrantly colored animals or large and impressive ones, they have more sale value. Pictures displaying dramatic behavior are also coveted. Basically try to capture unique or compelling photos that bring new light to old subjects.
When shooting wildlife portraits you want to use a fast shutter speed to capture the animal and prevent blur caused by movement. You also want to focus on the animals face, in particular it's eye which should be wide open, clearly illuminated and show a small twinkling of natural light.
Photographing group portraits of wild animals presents problems since there are many subjects to capture. Having a main subject and using the other animals as support can work well unless you are shooting two creatures. With two animals try to shoot ones that are around the same size and are engaged in similar behavior.
When lighting a wildlife portrait the standard is to utilize early morning or late afternoon front lighting. This low light will illuminate your subject and won't blow out your picture with too much light.
All these things will help create a more stunning image of the wildlife you are trying to capture a portrait of.

Wednesday, October 28, 2009

Vincent Munier


After watching his video in class, I went to Vincent Munier's website. I enjoyed his video and his ability to capture animals movement. His website is a pain to navigate and takes a while to load but he has some amazing photos.
He has an amazing ability to capture animals in action so I figured after reading the chapter "Animals in Action" in our textbook his photos would help elaborate on the subject. I liked how he captured the diving birds and the splashing water from the bears feet in his video. So I was happy to find that he has many more action photos like the shots in his video. I really like the photo I posted here. The fighting bears and the splashing water make for a stunning image and the blurred green backdrop makes the brown bears stand out even more. The picture really needs no description, it's just an amazing photo.
He takes a lot of winter photography and uses the white background of the season to create very moving and emotional images. I really like his ghostly winter photos, he creates hazy silhouettes of animals showcasing their struggle to survive. The image I posted here is a perfect example. The photo has a cold desolate feeling and makes you feel sorry for the geese trying to live in such a place. The imagery is stunning even without any prominent colors standing out. He uses the white winter landscapes to great effect making his photos seem endless and hopeless as he captures animals at their most vulnerable moments.
I had to go find bootleg photos on the internet since you can't copy any of his images and I was happy with the two I found, but he has even better ones on his site, which I would recommend to everyone.

Animals in Action

The chapter on Animals in Action in Tim Fitzharris' book gives some good tips on how to capture the image you want. He reiterates that knowing your subject and where you can find it is invaluable. Knowing where to find and at what time of year you can find your subject makes life much easier and photography less frustrating. To capture the images you want you will also need to be in the right place at the right time of day. This generally means that you need to be ready to shoot at sunrise or sunset, when animals are most active.
If you want to capture a wild animals normal behavior then keep your distance and get a better lens, so they aren't reacting to your presence.
Adjust the angle of your shot to create the image you want. Lower your tripod and get down low to the ground to capture an intimate photo at the animals eye level. This will also make you less threatening to the animal.
While shooting wildlife it is best to shoot, shoot and shoot. Worry about the pictures later capture as many shots as you can while you can and keep your camera up so you don't miss anything. You can edit and view your photos when you get home. Don't get caught looking at your photo cache when a great opportunity is presenting itself in front of you.
Becoming well acquainted with your camera and knowing how to focus on a moving subject without a second thought will create the images you want. You don't want to be fumbling around with your focus while a bird is flying over your head. As the saying goes, practice makes perfect. Practice taking photos of animals that are less interesting to you, so you don't blow it the moment you are in the field trying to capture a more fascinating subject.
Patience is important for getting a sharp image of a moving animal. Having an animal in focus before they move is effective for capturing images of yawning or stretching. For a running or flying animal you want to pan along with their movement while shooting and follow through to keep the animal where you want within the frame. You can also anticipate the movement of the animal and have your camera set in focus and wait for the animal to move into the frame to capture your image.
Finding a good stage or background for your subject can make or break a photo. If you anticipate an animals movement (correctly) it gives you the ability to choose what the background will be. By focusing on an area that the animal will pass through you can set up the frame and wait for the subject to move into place then you will capture the image on the stage you want.
Knowing your subjects behavior is also important. Most animal activities are repetitive. If you know what to look for you can capture the action as it happens.

Getting Close

To capture a photo of a wild animal in great detail you need to get close to it. How close depends on the lens you use. Wielding a point and shoot camera means I'll need to learn how to get within a short distance of wild animals or shoot them with tranquilizers to be able to get close enough to capture close up intimate shots. Shooting an animal with a tranquilizer goes against my ethics and violates some laws I'm sure, so honing my skills to get close to wild animals is what I'm going to have to do.
Tim Fitzharris discusses in his book various ways in which to do this. An animals experience with humans will determine your ability to approach and get near them. If the animal lives in a park frequented by humans or in a place where they have grown without fear of humans then your ability to approach them will be easier.
First off you need to know how to find your subject. Where do they usually frequent? Do they hibernate and if so when? Knowing where and when to find your subject will limit frustration. Once you know where and when to find your subject go and track them down.
When you track them down be sure to figure out how your subject feels about your presence and how close it will allow you to get. If the animal becomes agitated back off don't make them feel threatened by you or they may run or fly off on you. If you are standing in their only direction to flee you may get attacked by the frightened creature. So be cautious when approaching any type of wildlife species.
While all wild animals have general characteristics that you should be aware of, every wild animal will also have an individual personality. You will have to figure out your subject's personality on your own when you find them. Look for signs of agitation while approaching your subject and if they appear greatly upset by your presence find a new subject.
Animals hearing is far too keen for humans to sneak up on them. For the most part they will know you're coming. In order to get as close as you want to capture a great picture of a wild animal, you will need to appear non-threatening. Do this by getting low to the ground and crawl if you have to while advancing slowly. Going directly at you subject can work with some animals, but if you have a timid creature you should use a more round about approach.
Another effective method for photographing wildlife is to know where your subject is going to be and get there before them and conceal yourself. Hiding out in a blind allows you to get close to animals without frightening them. There are different methods and types of blinds you can utilize. An automobile makes a good blind because it conceals your body well and is far less intimidating to an animal than your moving body. You want to set up blinds in a spot you know animals will frequent, so again you need to do your homework and know where the best spots are and what time to be there. Blinds don't need to be elaborate they just need to conceal you and allow you close access to your subject, covering yourself and your camera in camouflage is better than nothing.
Another tactic that Tim talks about is bringing the animal to you by baiting. He likes to use peanut butter to draw in his subjects. This seems like an effective method but also seems like cheating to me. Half the fun of taking a good picture is in the reward of capturing an animal by chance, so patience and persistence is the best method for me to capture images of wildlife.

Tuesday, October 20, 2009

Zimmerman Park


My girlfriend and I drove up Zimmerman Trail the other day to check out Zimmerman Park. Despite the lack of a creative name, it's a beautiful park with a great view of Billings and the surrounding area. You can see for miles up on top of the rim. Coming from the flat state of Michigan any rock formation or elevation change is amazing to me. Being a rock climber I may find rock formations more interesting than most, both for the aesthetic beauty and also because I enjoy trying to find fun or challenging new climbs to try out. The sandstone up there for the most part is too brittle to climb, but I found a few good spots to boulder. Anyway, I also found an opportunity to take some photos while I was there. I liked this photo because another nerdy hobby of mine is bonsai, so finding a tree that has been naturally stunted and deformed is always exciting to me. I also thought it was a cool layout with the rims in the background leading out towards the distant landscape. Although looking at it again, I wish I would have placed the tree a little more to left of the shot. Maybe, I'll go recapture this shot again soon, since the park is only a few minutes away and makes for a nice excursion to forget about school and work for awhile. I'm sure there's plenty more photo opportunities up there as well.

Designing the Picture Space


Shooting a photograph is easy but taking a great photo requires some thought or just having the knack for seeing good pictures. There are many questions to answer when taking a photo. Do you want a single subject or multiple objects in the shot? Are you going to take a picture of an animal or are you going to take a picture of an animal and it's surroundings? Where are you going to place that subject or subjects in the picture? Is that animal going to be in the middle or on a side or in the corner? What colors do you want to stand out or not? Are there vibrant reds that will take center stage or do you want a more of a cool theme to your photo? What is the overall theme you wish to capture? All these questions have different answers depending where, when and what you are shooting. It's your job as the photographer to figure out the why and try to express that to the people who view your photo.
The two photos I've chosen are both beautiful and expressive for very different reasons. I ransacked Ernst Haas's collection again to get them.
The elephant photo has multiple subjects, of course the elephant but the mountain is the dominant feature taking up the majority of the picture while the grass composes an interesting element to the shot. The blue and green are both cool colors creating a sort of solemn mood while the dull brown strip in the middle makes the green and blue stand out more vibrantly. The mountain takes up the top two thirds of the photo and the cliff shape brings your attention back down to the elephant in the corner walking off into the vast distance of the immense landscape.
The volcano shot has a few different subjects the white smoke, the black crater, but the photo's main feature is the lava. The bright reds and oranges of the lava draw your attention right away. The spewing lava, jagged rock and ghostly white smoke make for a very dramatic photo.

Wednesday, October 7, 2009

Art Walk

Last Friday, my girlfriend and I went to the art walk downtown. We started down on Montana Ave because there are five studios right by each other, although one studio had a sign saying he was having hernia surgery so he wouldn't be there. But anyway, we went to the other four starting with the Toucan Gallery. Most of the art there were paintings, which for the most part were good. There was some cool ceramics and some crazy sculptures that danced. There was some photography at this studio as well. Not a whole lot and nothing that I can remember. Which doesn't mean that the photography was bad, it was just the first place we went to that night and it turned out to be a long night, but that is besides the point. The next gallery we went to was a photography studio but they didn't seem like they were too involved in the event so we just glanced in. They had a lot of portraits hanging on the walls and they also had some cool woodworking in the front, which I would like to get into some day, so I enjoyed it quite a bit. Next we went to the Tompkins Tanner Degenhart Fine Arts Gallery. No photography, but they did paint a lot of landscapes and natural scenes. I was particularly fond of the Indian Paintbrush painting they had on display. The last studio we went to on Montana Ave was the Prodigal Gallery, I wasn't a fan of the art but the owner's little dog Mungus was cute. After that we hoofed it over to the CTA Atrium Gallery on N. 23rd St. This was a cool building and they had some pretty excellent art and photography on display, which they were auctioning off. The building is also an office for an architectural design firm and they had some cool photos of different buildings that they have built and designed around the country. Next, we went to the McCormick Cafe which apart from the free cookie wasn't worth going to. I've said before that I'm not too interested in abstract photography, with some exceptions, that being said my tolerance for abstract art is even less and that's all they had on display. The last place we went to before Carter's was the Transformation Spa & Wellness. I don't remember who the photographer was but they had some pretty amazing photos on display. There were three in particular that I liked one was of a willow tree, another of lily pads and flowers and the final one was a massive 4' x 5' (rough guess) print of a stream in WA state. The stream was really nice, you could tell that they had used a long exposure in the low light setting. The water was streaking and some of the ferns were blurry from the water hitting them and everything from the wet rocks down to the moss was in great detail even with such a large print. All in all it was a good time and we will probably try to go to the next show, which is on Friday, December 4 from 5 to 9. If I haven't convinced you to go yet, they also have free wine and snacks.

Wednesday, September 30, 2009


While I was doing research for our trip I decided to check out Art Wolfe's website, because he had done three episodes for "Travel's to the Edge" in the South American Region that we are planning for. I also read his Wikipedia page and learned about his major influences one of which was Ernst Haas. So, basically I got sidetracked while doing research. Anyway, Haas was a Photographer from Austria who moved to New York in 1953. I liked his photography because it's from a different era or vintage if you want to call it that. I'm not usually a fan of abstract stuff, but he had an ability to capture simple everyday things and turn them into art. Such as peeling paint, scratches on a car and junkyards. I posted some of the abstract photos that I liked above. I guess I have overcome my bias for blurry images thanks to Ernst Haas because I really liked this image of a flying bird. It's deep blue color is great combined with the ghostly image of the flying bird. The next photo I posted shows his belief in finding beauty in everyday things. I almost don't want to say what it is because it makes the photo seem less amazing, but it is just soap in swirls on a window. I just found it to be an amazing and captivating shot even if it is just soap. He was also famous for shooting movie stars and other famous people. He captured the time period well with photos of Einstein, Marilyn Monroe, Martin Luther King, Jr, and many other famous people. All I can say is that I was glad to get sidetracked and find Haas's images not just for their beauty but also for their history.

Monday, September 28, 2009

Short and Long Exposure


My final two photos, for long and short exposures, turned out to be a little tricky with my point and shoot camera. I went down to Pioneer Park off of Virginia Lane. There is a little stream that runs through the park and I tried to capture the water at a little rapid in that stream. I liked this spot not just for the little cataract in the water but also for the deep red roots on the eastern bank. I grouped these two photos together so the difference between them could be seen a little better. The lower photo is my attempt at a short exposure. I liked how I was able to capture the large water splashes in the air. You can also see more of the air bubbles in this photo than in my long exposure and overall the water is less blurry and more detailed. In my long exposure at the top the water is more blurry and the splashes are more of a streak. I know they are only slightly different but I like my longer exposure more because I think the general layout is better. I think the color contrasts are nicer in it, since I got more of the bright green grass on the other side.

Narrow Depth of Field

I got lucky with my narrow depth of Field shot, I didn't even half to leave home. This locust was hanging out on my window, so I was able to get an interesting shot of his underside. I like that you can see the different features of his exoskeleton and if you look at the full size image you can see the hairs and bristles on his legs.

Wide Depth of Field

For my shooting assignments I didn't travel too far from Rocky's campus. I first went up to Phipps Park off of Molt Rd, it's also known as the Diamond X disc golf course. I was able to get my wide depth of field photo there. I tried to get a few of the assigned pictures here, but was only able to get the wide depth of field view. I haven't modified it at all but I liked the dark light, the half moon and the orange-red of the rock.

Wednesday, September 23, 2009

My wonderful point and shoot camera

Our assignment for next week is to create four different images. Two of the photos will deal with depth of field, with one having a narrow and the other having a wide depth of field. The other two photos are going to be of a long and short exposure. Now, I only have a 5 mega pixel Nikon Coolpix point and shoot camera, so I won't be able to adjust my aperture and shutter speed to get these shots. I can however use the pre-programmed settings on my camera in an attempt to achieve the desired effects. To get the narrow depth of field there is a close up setting, depicted by a flower, which I have used in the past to get pictures of insects and of course flowers. For the wide depth of field I will probably use the landscape setting on my camera which does a decent job for it's purpose. For the short exposure I'm going to use the sports setting to capture my image. As for the long exposure I think I might try to use the night landscape or night portrait setting. I have never used the night portrait or sports settings before and only used the night landscape a few times without much success, so this should be an interesting assignment. Hopefully, I can learn a few things about my trusty point and shoot camera.

Tim Fitzharris

I decided to check out our textbook author's website www.timfitzharris.com. I have to admit I was not entirely impressed with everything I found on there. It was a learning experience though, as now I know what a bull elk's penis looks like. Also, his bighorn sheep herd photos are blurry and upon further viewing I found that he intended to make them blurry for an artistic appeal, because the photo was also in the Reverie limited edition print section. To each their own, I guess. I like the photos where he pans with a moving animal and blurs out the background, like he did with the baby bison, but the all blurry approach I don't find appealing. The fine art print section was pretty spectacular, I especially liked the Alpine Vistas and Reflection landscape photos. The colors are breathtaking. Overall most of the photos were great he captures different colors extremely well. I think he's an amazing landscape photographer, but I was more moved by Tom Mangelsen's animal photos than Tim's.

Wednesday, September 16, 2009

Exposure

Exposure is the total amount of light allowed to fall on the photographic medium (film or digital image sensor) during the process of taking a photograph. Getting the perfect exposure isn't as easy as many think. There are many variables involved with getting a perfect exposure, such as aperture size and shutter speed.
Aperture is the size of the hole letting light in or the intensity of the light during the photo. A wide aperture results in a sharp image around what the lens is focusing on, which is good for wildlife or sports photography. A narrow aperture lets in less light and is useful for landscape photography because it creates a sharp focus on all the objects within the frame.
Shutter speed is the exposure time of a photograph. A fast shutter speed will capture a moving image quickly and combined with a wide aperture focusing on a subject, will create a sharp image of a moving athlete or animal. A slow shutter speed (obviously) takes longer for the exposure, and wouldn't be ideal for sports or animals where there is constant movement. This would make the image look blurry. A slow shutter speed and a narrow aperture are the setting ideal for a landscape because with the narrow opening you get a sharp focus on the entire image and the slow shutter speed allows enough light to get in through the narrow opening to catch the image.
The general rule of thumb is the wider the aperture the faster the shutter speed and a narrower aperture calls for a slower shutter speed.
Digital cameras have made this easier on photographers in many ways. One thing that you get with digital is the histogram which can give you instant detailed feedback on the accuracy of the exposure for your photos. The histogram graphs the luminance values in the frames and will give you advice on how to adjust the aperture or shutter speed if need be. Practicing on landscapes until you get this down is advised because if you are trying to capture wildlife such as a flying bird you may not get a second chance for a shot. Knowing how to use your equipment and what you want to shoot are also very important for getting the perfect exposure.

Tom Mangelsen

I went to Tom Mangelsen's website, www.mangelsen.com, after he was brought up in class to see what kind of photography he was into. His accolades are quite impressive he was named by BBC as "Wildlife Photographer of the Year" in 1994 and the North American Nature Photographer's "Outstanding Nature Photographer of the Year in 2000." Most recently in 2005 he was named "One of the 100 Most Important People in Photography" by the American Photo Magazine, and was only one of two wildlife-environmental photographers selected for the list. Having got this introduction to him in his about Tom tab needless to say I was intrigued to see some of his work. I checked out his Spring 2009 limited edition section first and was wowed and not just because of the cost of some of his photos but by how great they are. The detail is amazing, I'm sure he has some ridiculously amazing camera and lenses to get that fine detail. He is an amazing landscape photographer but he has a real skill for capturing wildlife. His photos aren't just pictures of animals, they show the emotion, humor and lifestyle of the animals he captures. I didn't know who had shot the photo, but I've seen the the Peek-a-boo Polar Bear photo before. His photos are amazing and you could spend hours getting lost in his collection.

Saturday, September 5, 2009

Super-telephoto Lenses

I don't have a DSLR camera yet, so I have no need for a super-telephoto lens at this point in time, but the advise given by Tim Fitzharris in his book "Nature Photography" proved to be very helpful. I don't know a whole lot about photography equipment, I just use my little point and click Nikon camera right now. I like to research things before I buy them, so all the advice I can get is helpful. I like his statement that if you're restless, not terribly big and like to get off the beaten path, then the 500mm is your focal length. This is good advice from an expert on the 500mm vs 600mm debate. Although, I am a long way away from purchasing a super-telephoto lens it is good to have this kind of input. I prefer to go off the beaten path and, while I'm not a sissy, I am also not the biggest bloke around, so the smaller lens will suit my amateur ambitions just fine. He has me sold on Canon lenses for their diffractive optical elements that eliminate chromatic aberrations and reduces the size and weight of the lenses by three-quarters and two-thirds respectively, now I just need to increase the size of my salary so I can afford one. Also, being one of the two companies that have image stabilization in their super-telephoto lenses makes Canon even more desirable. I don't pretend to understand all the technical advice he gives, but I guess I'll figure that out when I get new equipment that utilizes everything he is talking about.

Working in the Field, Winter Photography, Nature Photography's Year

I was happy to read in "Nature Photography" by Tim Fitzharris that the equipment I've gathered and used throughout the years will be able to cross over into my photography needs. I've always been an avid outdoors man and have quite a bit of outdoor clothing and gear. The first thing I thought of when he said invest in a vest was my fly fishing vest. While it isn't as rugged as the one he describes it has an incredible amount of pockets for all sorts of fishing gear and can easily be used for holding different camera equipment. I just need some money to fill those pockets with camera equipment.
I like Tim's use of every day household items for gear, especially the plastic bag rain cover. It's light, compact and best of all for my budget cheap. He has a lot of useful little tips for trimming down the amount of stuff you bring and ways to organize, which I like because as a backpacker I can understand the need for trimming down weight and keeping things simple and efficient.
I have gathered a whole wardrobe of clothing for hiking, backpacking and ice climbing over the years which will work well for photography in any season. I like how straight forward he is about cold weather, it can kill you. You need to be prepared for any outing in cold weather. Having a waterproof and windproof shell is invaluable. My Arcteryx shell is my favorite piece of gear. I climbed up a frozen waterfall that was dripping icy cold water on me throughout the climb. I came down coated in ice, but I was dry and comfortable underneath thanks to my shell.
One can not underestimate the need for wicking and warm base layers like capilene during the winter months either, having wicking clothing is great so long as, like Tim says, you vent properly. Wicking material is pointless if you trap that moisture in under your outer shell. I don't recommend forgoing the shell but like he suggests get one with armpit vents. Venting and regulating your temperature in these cold conditions is not just a good idea but can save your life. If you start feeling too warm remove a layer if you have to or take a moment to rest so you don't overheat. Hypothermia is a very real threat if you start sweating heavily while hiking and stop for a moment to shoot some photos or rest.
My camera takes lithium ion batteries and I always bring two in cold weather. It is vital that you do, with one kept next to your body for warmth. You will learn quickly that batteries are not made for extreme cold. I wasn't outside for more than a half hour before my camera said my battery was dead on an ice climbing trip, but if you just continue to swap the warm one with the cold one you can continue on. Something I didn't know but was glad to learn was the advise to bring a trash bag to put your camera equipment in to prevent moisture damage from condensation.
I think the winter months are a great time to take photos the light and dark contrasts are great and snow and ice can make for very dramatic photos.
His chapter "Nature Photography's Year" was a good reference for when to visit certain places throughout the year, if you have the time, money and vacation time to do so.

Wednesday, September 2, 2009

After mentioning that I was a fan of Andy Goldsworthy my professor suggested I check out Edward Weston. I went to his site http://www.edward-weston.com/ and found some amazing photographs. I've always admired Ansel Adams for his black and white nature photographs and Edward has a similar style. I especially liked his photographs of strange looking vegtables and fungus. I've always found mushrooms, fungus and lichens to be interesting topics for photos because of the variety of color that they provide. Weston's photos are great because they present a more dramatic picture than you get with color. Some of his family members followed him in the photography tradition and have pictures posted on the site which are also interesting .

Tripods

I was trying to find a reasonably priced, stable, light and durable tripod and found one that I think fits my budget and needs fairly well. The Slik PRO 700 DX is made of titanium, weighs 7 lbs, and costs $139.95 (before shipping). It can be raised to over 6 ft which is far more than my stature of 5'9" needs and can hold a load of 15lbs. It doesn't have quick release but I think I can forgo that feature until I have more money to spend on better equipment.

http://wize.com/tripods/p20732-slik-pro-700-dx

Wednesday, August 26, 2009

Andy Goldsworthy

I randomly found out about Andy Goldsworthy one day when I walked into the University of Michigan art museum in Ann Arbor where I used to live. There was a temporary exhibit of his art on display and I instantly loved it.
I like how he takes natural things and manipulates them into something unique and beautiful.
The simplicity of his creations is what I enjoy most. It reminds me of things I would do as a kid but on a much grander and more intricate scale.
When most people think about nature photography they don't think of manipulating natural elements to make art. Most people think of pictures showing landscapes and animals. Andy, not only has a great first name, but has brought a different element to nature photography and art that I really appreciate.
http://www.goldsworthy.cc.gla.ac.uk/